

Motto: ” There are No Accidents. ”
The Calgary Section Safety Committee operates within the Calgary Section of the Alpine Club of Canada, and is therefore committed in general to the principles of the ACC (ie., the ‘Main Club’ ), and its Safety Committee. It’s Objectives and Responsibilities are similar to those of the Safety Committee of the Alpine Club of Canada.
NOTE: SAFETY – RELATED ARTICLES FOLLOW DIRECTLY BELOW, WITH DESCRIPTIONS OF THE PURPOSE, WORK, AND STRUCTURE OF THE SAFETY COMMITTEE AT THE END:
*********************************************************************
ARTICLES
A review of our First Case was completed early in 2015 — Its result is the last of the following articles, with later cases, findings, or comments on other subjects listed in order above it — most recent first:
22. Comfort and Peril in Winter Camping, February 2020
21. Holding On To a Rope — a Basic Climbing Skill, November 2019
20. False Pillars — an Ice Climbing Hazard, April 2019
19. Soloing, Or … Death by Intent, December 2018
18. Disaster on Yamnuska July 2018
17. Tree-Wells: — Under-rated but Deadly Threat in Snow Country Mar 2018
16. Crossing Lake Ice: Considerations for Safety and Rescue March 2018
15. Lake Ice: When is it Safe to Cross? Feb. 2018
14. Tick Alert June 2017
13. CAUTION Re: Cornices May 2017
12. Safety on Icey Trails: Take Ice Creepers and USE Them Apr. 2017
11. CAUTION using Commercial Utility Rope as Accessory Cord Jan. 2017
10. How to Secure Any Flat Rappel Rope Knot, Using Only the Rope Nov. 2016
9. Dropped Gear: Is It Safe to Use? Oct. 2016
8. How to Untie a Double Fisherman Joining Knot July 2016
7. An Easy Solution to Your Flat-Knot Concerns July 2016
6. Untieing a Knot July 2016
5. CAUTION Regarding Rappel Knots June 2016
4. CAUTION Regarding Keepers on Runners/Carabiners Dec. 2015
3. Skis in Crevasse Rescue Dec. 2015
2. CAUTION Bushwhacking re. Twigs and Branches Dec. 2015
1. CAUTION Extending Tripled-Up Alpine Sling Runners May 2015
~~~~~~~~~~~~~~~~~~~~~~~~~~~~~~~~~~~~~~~~~~~~~~~~~~~~~~~~~~~~~~~~
Case 22, Feb. 3, 2020
Comfort and Peril in Winter Camping
Thirteen years has passed since the death of 2 ski campers in a snow shelter on the Wapta Icefield in January, 2007. Now at the peak of another winter season, with our members and friends undertaking overnight tours in the cold backcountry, this is a good time to review that tragedy and learn any lessons from it that should be kept in mind and applied as appropriate in current winter camping practice.
What happened at that time is that a capable young couple started out on skis from Stanley Mitchell cabin, en route to Bow Hut. They hoped to cover the full distance in one day, but with a somewhat late start, they realized they may need to stop partway and camp to break the trip into two segments. They didn’t have a tent but had used snow shelters before and were prepared to do that again if necessary.
They then failed to appear for commitments a few days later, so Parks Canada searched their route and found their bodies in a collapsed snow trench below Mt. Collie, under 1.5 metres of snow. The mode of the collapse wasn’t specified, but the couple had roofed their trench with their skis and a tarp, and those were still at least partly in place and at the surface, so any roof collapse must have been only partial, and new snow accumulation should not have been a significant factor in the collapse or in trapping the victims. The recovery team reported that the trench had been widened toward the bottom to create space for sleeping platforms, so it’s possible that a side of the trench had fallen in, but such collapses are rare and self-limiting and, it’s very unlikely that it would have been enough to kill or even pin the couple. But a partial roof collapse may have allowed drifting snow to filter in and mostly-fill the trench in the days after the accident, which was originally called a “snow cave collapse”.
However the bodies contained high levels of carbon monoxide: the man had a fatal level, the woman somewhat less. Their hands and fingers were scratched and abraded, indicating a struggle as they apparently tried to dig themselves out of the collapsed debris, though it’s not known whether one or both victims showed these signs; the fatal carbon monoxide level in the man suggests he may not have been able to struggle at all.
This scenario likely led to the disaster:
The couple ascended the Des Poilus Glacier and the headwall to the level west crest of the Wapta neve just south of Mt. Collie by about 4:30pm and realized they couldn’t reach Bow Hut in daylight, as it was still miles away. So they built their shelter by digging a trench straight down in the flat snow, covered it with a roof of skis, a tarp, and likely some snow to hold the tarp in place. They closed themselves inside it with little or no ventilation, and proceeded to make themselves comfortable, including cooking and likely keeping the stove running for a long time with a low, yellow flame, heating tea and providing homey warmth.
It’s quite possible that they even fell asleep with the stove running. It would be very difficult to provide floor-level ventilation for ‘heavy’ carbon monoxide in a trench dug down into a flat snow field, and they didn’t do that, so carbon monoxide from the stove settled on the floor of the trench … where the couple would sleep. Quite possibly the man laid down first and fell asleep, as indicated by the higher level of carbon monoxide in his blood. The woman may have stayed ‘up’ longer, possibly sitting up, maybe reading or writing, but eventually fell asleep too – in the pool of accumulated CO. Some time later, likely during the same night, the lightly-built shelter roof with only a foot or less of new snow on it partially collapsed on the couple inside, exposing them to the weather; one or both of them roused and struggled to extricate them, but they were both too debilitated by then to succeed, and they eventually passed away, either from CO poisoning or by freezing. Over the next few days, falling and drifting snow filled in the partly collapsed trench and nearly covered all signs of its presence: only the top of a shovel handle remained exposed to view and was what alerted the search party.
As the analysis of the incident continued in the days after the recovery, the “snow cave collapse” became a fairly definite case of primarily carbon monoxide poisoning. I have personally been in three snow shelter collapses: one accidental–a quinze with a thin roof, and two deliberate/experimental–an igloo, and a snow cave with a sagging roof: the sagging inner 3″ layer of the roof fell in, leaving the rest self-supporting. I’ve also skied or walked over snow caves (or seen other people do it), and in every case if the roof collapsed, the amount of debris would have been only about shin-deep at most, so a healthy ‘victim’ could simply stand up and be out of it.
Then came a few interviews with ‘experts’ who naturally condemned the use of stoves in shelters entirely because of this deadly hazard of carbon monoxide. But such people can not be familiar with winter camping, except maybe in an institutional setting with a separate cooking tent. But for the case of a small party traveling in winter, people keep warm by moving, and when they stop, camp is set up, they finish outdoor activities of sorting, toilet, and collecting snow for water, and they get in to shelter for the night. Rarely is the weather conducive to cooking outside, a sunny morning being the usual exception.
It only makes sense to enjoy your shelter fully as part of your rest after a day’s travel. The simmering stove becomes the hub of your temporary bubble of comfort in a harsh environment, and can be kept running for even hours, providing supper, tea, and water for the night and morning. But the stove has to be tended, ventilation maintained, especially a floor-level drain for carbon monoxide, and turned off for the night.
Tents are inherently good for ventilation, as they tend to breathe as the sides move and flap. In most cases, the weight of a tent is a small price to pay for its advantages over all snow shelters, in speed, dryness, and convenience, so I prefer to always carry a small tent and use it in most cases.
But for extreme conditions of wind, cold, and snowfall, snow shelters provide protection unequaled by tents. Among snow shelters, a cave in a high, steep-sided snow drift provides the best mix of convenience and structural strength, as long as the roof is arched and clear spans are minimized. A snow cave can be very good with a ‘gopher hole’ (door) that can be covered with a pack to keep the wind and snow out, uncovered for ventilation drainage — air inlets poked in the roof or wall with a ski pole. Similarly igloos and quinzes, being above ‘terrain’, tend to breathe well but should also have air ports and a floor-level ‘drain’, for which a floor-level doorway with an outside pit works very well.
Particularly for the night, the stove should be turned off and depressurized, and every shelter ventilated well by opening the door and moving the inside air around thoroughly by waving jackets or sleeping bags. After that, personal comfort depends on your sleeping bags.
As for snow trenches and ‘pits’, I have made and used them a couple of times and found them convenient to dig but inconvenient to use: OK for shelter, but not for ‘living’, and worthy of suspicion, to be used only as a last resort and cautiously at that. One suggestion I can make for a snow trench is to dig it twice as long as needed (more work), with one end higher: roof over the high half for shelter, leaving the low end open to the wind for ventilation, and use your imagination for a halfway door closure to keep an opening at the floor.
Orvel
~~~~~~~~~~~~~~~~~~~~~~~~~~~~~~~~~~~~~~~~~~~~~~~~~~~~~~~~~~~~~~~~
Case 21, Nov. 5, 2019
How Do You Hold a Rope?
How do you, or how WOULD you, hold a rope?
I mean, how do or would YOU, REALLY hold on to a rope?
I mean, how do or would you, GRIP a rope, IF you really had to hang on to it? For example, to pull hard on a rope: to extract someone from a crevasse, or help pull a stuck vehicle or to pull down a stuck rappel rope; OR, to keep a rope from getting away, for example, as a quick temporary belay of a top rope from below, while the belayer passes a knot.
Of course, many climbers would immediately say, “With a device, a brake.”
But there are many times in climbing and mountaineering, when using a brake is simply impractical. A prime example is during short-roping in mountaineering — a practical and time-efficient alternative to pitched climbing: team members repeatedly need to be protected briefly with the rope, before moving some distance over easy terrain to another short section of difficulty. Such cycles of action may need to be repeated HUNDREDS of times in a single day by an attentive leader watching out for a number of party members. In such cases, the use of a mechanical brake wastes a lot of time if unnecessary, and at the same time dangerously distracts the belayer from watching his group while threading, unthreading, and racking his device, AND greatly slows the travel of the party by feeding rope tediously through the brake. A climb may need to be extended a day or more, or abandoned, if party members insist on the text-book security of anchored brake belaying throughout.
In those cases, wouldn’t it be terrific to have a reliable and safe hand grip that can be instantly engaged and released? Yes (of course), and yet I rarely if ever see any such thing in use when it’s needed; a person usually just tries to pull or hold a rope with the basic palm grip, which is safe enough to the operator, but gives him very little pulling power before the rope slips;
OR he will wrap the rope once or twice around one or both hands, providing a secure grip all right … however he then has no ability to let the rope run at all, and may in fact be trapped by the rope and pulled over an edge or against terrain in case the load slips, eg., if a person on the other end of the rope stumbles or slips off a ledge.
BUT, this is IT: the awesome Figure 8 Hand Grip: the rope is gripped by (one) hand in a configuration similar to that of a Figure 8 belay/rappel brake, and its tension is transferred to the person’s arm and body, effectively bypassing his limited hand strength.

Starting the Figure 8 Grip
To apply the Figure 8 Grip, the incoming (load) rope is passed over the back of your hand and under the base of your thumb, which then grips it as a control function;

Your Thumb Controls the Tail
then or at the same time, you raise your fingers and grip the incoming rope.

Your Fingers Grip the Load End
You are then able to effortlessly pull or hold the rope to the full capability of your arm strength and positional stability.

The Figure 8 Grip in Use
The secureness of your grip is secondary to the strength of your arm and your body position. At the same time, the Grip is completely safe, as it allows the rope to run by relaxing your hand somewhat, or to be released by opening your hand. The Grip doesn’t rely on any equipment, and can be instantly applied or dropped alternately with short-coiling the rope and handling terrain while moving over it.
This technique is so simple as to seem trivial and so unnecessary to mention, but it’s necessary for people who don’t know it and can not answer the questions in my first 3 lines above with a better one, as no one seems to come up with it on the spur of the moment, but generally fumble around and may mess up: all climbers should know it.
Orvel
~~~~~~~~~~~~~~~~~~~~~~~~~~~~~~~~~~~~~~~~~~~~~~~~~~~~~~~~~~~~~~~~
Case 20, Apr. 11, 2019
False Pillars — A Hazard in Ice Climbing
Q.: How can a pillar be false? — A pillar is a pillar, isn’t it?
A.: No, not necessarily: something may look like a pillar, viz. an ice column that appears to be standing on the ground, but is actually hanging, ie., under tension. It formed from an icicle that grew downward while dripping on to snow below which is often a deep slide deposit. The snow got glazed over, so continued dripping water runs off to the side while the icicle continues to
grow and eventually touches down on the cone and then builds up sideways but is still
barely supported from below. It’s essencially still an icicle, but looks like a pillar.
Several times through the years I’ve seen columns that had fallen right over so their bases were turned up and were snow underneath rather than ice — eg., at Eenie Meenie Minie Moe, Valley of the Birds, and Wizard Prang. In other cases columns broke off but didn’t fall over, instead they dropped straight down a foot or more, though maybe tilted: how could that happen?

False Pillars at Wizard Prang
These fallen columns were ‘standing icicles’ as described above. They grew until they became too heavy for their upper attachment to support, and without compression support below, they broke off and settled in the snow under them.
There’s a hazard in such a False Pillar, that climbers may get on to it as a solid column, but at some point in the pitch, usually higher up where the pillar may be thinner and with a greater weight of ice hanging below, an axe strike or crampon kick may start a fracture that releases the pillar, that may then fall apart or topple over with the climber on it, or on others below.
It’s something else to watch for.
Orvel
~~~~~~~~~~~~~~~~~~~~~~~~~~~~~~~~~~~~~~~~~~~~~~~~~~~~~~~~~~~~~~~~
Case 19, Jan. 1, 2019
Death by Intent
The death of a climber soloing Cascade Falls at Christmas, 2018 was a tragedy for himself and his family, but although such fatalities are not very common, they are to be expected from time to time. Soloing seems to be getting more common over the last few years, likely stimulated by advances in climbing equipment.
Unfortunately the significant points on both sides of any debate over the practice of unprotected climbing haven’t changed a bit throughout the history of climbing in spite of improvements in equipment or even climbing skills. Unprotected climbing is really the issue, as soloing can be done quite safely, though tediously, with a rope and protection, while on the other hand a climber without protection is no better off in the presence of companions than alone, ie., he is still climbing “solo” in this sense. For convenience, we consider “soloing” to mean “unprotected climbing”.
Soloing stirs up feelings of frustration in other climbers: “What is the guy thinking?”; “IS he thinking?”; “He seems so normal! — does he really value his life so little?” The death of a soloist has a strong aura of inevitability around it: “What great reward did he hope to gain by risking his life that way?” … and so on. Every soloist MUST believe that he won’t make a mistake, and that by completing each climb without protection he proves to others that he is good. But falls happen for many reasons, not just personal failures: for example unpredictable equipment failures, and objective perils like rockfall and avalanche. If a block of ice falls from above and breaks a soloist’s arm, ice climbing and even retreat suddenly become very difficult for him, and he may fall to his death even if he initially manages to hang on, even though as a result of no personal failing … EXCEPT climbing without protection.
The fact is that all climbers fall sooner or later, and since most falls in climbing have the potential to cause injury and death, it only makes sense to be on a rope with protection when it happens to you. It’s a simple matter of statistical probabilities: the more consistently you use a rope and good protection while climbing, the more likely you are to be protected when YOUR accident happens. Most climbers take a dim view of soloing because they know that luck plays a significant role in all climbing, while the possible finality of a climbing fall renders soloing a reckless disregard for life and personal safety.
As a final consideration, a question of “WHAT soloing?” may be raised, as we all have different abilities and comfort levels, and we ALL ‘solo’ something at times. The trap for climbers to avoid is thinking “This is easy! — I don’t need the rope here…” Instead, the consideration SHOULD be “What would happen if I lost my balance here? Or a crampon came off, or I stepped on a chunk of ice between my points?” because any such thing could happen to anyone. Many accidents happen to good climbers in easy terrain: If you’re exposed, protect yourself.
But ‘solo’ climbing is actually a different matter: undertaking significant climbs without protection, and that is obviously a very bad idea for anyone who values his life.
Orvel
~~~~~~~~~~~~~~~~~~~~~~~~~~~~~~~~~~~~~~~~~~~~~~~~~~~~~~~~~~~~~~~~
Case 18, Oct. 23, 2018
Disaster on Yamnuska — A climber falls and his rope breaks:
On July 29 Ray and Kevin walked up the trails of Yamnuska with their eyes on the Chockstone Corner, one of the old 5.8 routes originally put up by Kahl and Lofthouse in 1963 as 12 pitches, just left of Grillmair Chimneys. These days it might be done in 8-10 pitches with the longer ropes now in common use. It was a reasonable day and these good intermediate climbers expected to complete their climb by later afternoon. They would share the leading and belaying by taking turns from pitch to pitch.
Things were progressing well when they reached the last pitch to the exit about 3:00 pm. It was Kevin’s turn to lead, so he took the rack and moved up. That was what’s generally considered the crux pitch and he ran in to some trouble up above Ray. With an unknown amount of protection in place but his last piece being a spring cam, he fell and to his horror the cam pulled out and so served little if any to slow his fall. Apparently the single rope that was his final protection snagged on rock above Ray, and the rope was cut — undoubtedly sliding over a rock edge or pulling through a notch, and Kevin fell past Ray and to his death several hundred feet below, leaving only a frayed rope end hanging above Ray in his view.

What We Never Want to See on a Climb
Ray managed to get a phone call out for help before his battery ran out, and he was helped off the face by rescuers about 3 hours later. As he himself pondered later, “what the F actually happened?” I have discussed the accident with a number of climbers and a few have called me to ask similar questions and discuss it with what little information we had for their own peace of mind: How does a rope break?
In analysis, as in most accidents, a number of failures can be listed as contributing to the devastating end of their climb — any one of which might have prevented or moderated it if it had been a bit different or corrected: in the first place, the leader Kevin fell: that’s something that most of us always try to avoid, as any fall is dangerous and leaves us relying on backups. In the second place, his top protection piece failed. Third, he apparently had no other lower protection in a position to hold his fall before he went past menacing rock edges. Fourth, the rock itself: we have to presume as I did that the rope was cut, as climbing ropes are designed to not break in straight tension under normal climbing-fall loads, normal-sized climbers, etc. BUT ropes certainly can get cut rather easily under tension over sharp or abrasive edges, or get chopped by falling rock. Fifth and finally for now, the rope: although it was a new modern rope in good condition, the practice of leading on a single (viz. ONE) rope only, and of that size 9.2mm, is debatable; these practices reflect a reduction in standards through the years to suit new generations of climbers wanting to go light for convenience and speed, but a heftier rope, say 10 or 11mm, may have just stopped Kevin’s fall even in spite of being badly mangled over an edge, whereas leading on two ropes instead of one, even if smaller ropes, may have saved the day in a number of ways: the greater combined bulk of two ropes may have survived rock-fraying as with a larger single rope, or one rope may have cushioned the other in a notch, or one rope may have been under less tension and fared better in running over an edge while the other suffered the most damage, OR one rope of two may have taken a different path and not been cut as badly or at all.
Ray may never climb again because of the shattering reality of being present and so somehow involved in a devastating accident and the loss of a friend in what should have been a fun day out — like SO MANY that he and others of us have enjoyed; but other climbers considering it from a distance will continue to climb and so need to justify in their own minds the obvious risks they take, usually by identifying the key causes and privately vowing to avoid those in their own practices.
Our recommendations are not exactly intended as advice, as every climber must finally decide for himself and with his partners, but rather as considerations that must be taken seriously in view of this and other such tragedies:
1. Be fully aware of the trade-off in safety when shopping for thin, light ropes, sometimes for the incentive of length: the weight of ‘the extra’ in a longer rope may be better put in to its bulk for durability, in the form of ‘thicker’ though shorter ropes.
2. Along the same line of simplicity and light weight vs. tangles and extra weight, there are still undeniable benefits to climbing on pairs of ropes, whether doubles/halves or twins.
3. Always be aware of the terrain you’re climbing through, especially loose blocks, sharp edges and notches, and imagine what could happen there in case of a fall; this is not a hypothetical suggestion that I just came up with now — it has been an ongoing consideration in rock climbing especially for years, but may seem a novel and impractical thought to some, especially newer climbers. In many cases protection can be placed to direct the ropes around such hazards, in other cases leaders should apply their ingenuity and extra caution, and particularly mention these to their partners, who could easily miss an important lesson otherwise.
4. Keep notice of your position throughout a climb, especially your exposure in spite of easy terrain, and don’t hesitate to pause and put in ‘unnecessary’ protection, including backups and even multiples.
5. Be a student of protection placement; imagine what COULD happen as well as what SHOULD — test every piece that you can, and consider all cams especially as fundamentally suspect: they CAN hold very well but often fly out for no obvious reason in dynamic loading and are especially subject to fail when the direction of loading changes.
6. If you ever find yourself wondering, step back down and put in another piece.
Orvel
~~~~~~~~~~~~~~~~~~~~~~~~~~~~~~~~~~~~~~~~~~~~~~~~~~~~~~~~~~~~~~~~
Case 17, Mar. 23, 2018
Tree-Well Epidemic
— An Under-rated but Deadly Threat in Snow Country:

Hidden Tree Well
With the winter of 2017-18 still in progress, tree-well accidents have already led to at least 5 deaths of snow recreationists in western Canada and the U.S. this season. In fact, 5 happened within a single week. This is an alarming unusual toll, as safety authorities say that rarely more than one tree-well death happens in any winter.
It seems that here in Alberta, with typical shallow snow packs of 1-2 metres, we tend to think of a tree well as an occasional nuisance but rarely of much serious concern; it’s an open cone around the base of a tree, with a maximum depth of less than the height of a person, maybe about 1.5m. A person passing or standing too close may veer or topple toward the tree, but generally suffers only a frustrating entanglement in branches and snow.
However in the interior of B.C. and other such regions with deep snow packs usual, and even occasionally in Alberta, as this winter with a much heavier snowfall accumulation, snow depths may range typically from 3 to 6 metres — that’s 20 feet — and even more in places. Entire trees may be engulfed by snow, with the shedding action of the branches of the usual coniferous tree protecting its footprint and causing a rapid buildup around the perimeter. A tree may be completely covered, and even when only its top still shows — it may look like a seedling on a rise — it actually conceals a bottle-shaped pit of a hundred cubic feet or more in volume, expanding downward to the base 5 metres below.
A deep snow pack insulates the ground and usually harbors a melting environment at its base. Inside a closed or nearly-closed tree well, the air may be at or above the melting point, and so lead to rapid transformation of the surrounding snow to the loose consistencies of sugar or corn.
A skier or boarder who comes too close may find the hollow snow sinks, his ride drops and stops, so he falls over, and goes headfirst into the tree-well if he happens to topple in that direction. His feet are anchored at the surface, while he hangs inverted in the well, with loose snow falling in on and around him from the surface and collapsing walls of the well.
Apparently victims are rarely killed outright, but rather asphyxiate in the snow or are trapped and eventually freeze.
The spate of recent tree-well fatalities naturally arouses fresh interest in this hazard, among snow enthusiasts everywhere, getting them thinking over what/more we can do to avoid becoming victims, help our friends, and save victims. Someone even suggested that skiers could consider roping up during tree-skiing — as on glaciers — but that idea obviously wouldn’t go over well in the freedom-driven snow-sports community.
The obvious safety imperatives for skiers, boarders, even snow shoers are to stick strictly to a buddy system and always keep in communication with their partners. Victims are strongly advised: concentrate first on getting free of your poles and ‘ride’ so you can maneuver in the well and maintain air space for breathing.
Videos of actual tree-well rescues clearly show the tremendous difficulty and amount of work needed to extricate a victim from a deep tree well, hence the great importance of plenty of helpers with shovels. As some victims have been found some time after their accident, they sometimes need to be tracked to an accident site, where ‘other’ tracks could easily conflict and conceal it, so the advisability of avalanche transceivers is doubly obvious for this purpose.
Many videos of tree-well incidents, both staged and accidental, can be found online and are well worth seeing, for an up-close impression of some of the problems and factors involved.
Anyone tree-skiing with only one or two companions should ensure that they are good friends, and anyone skiing alone is really asking for trouble.
Orvel
~~~~~~~~~~~~~~~~~~~~~~~~~~~~~~~~~~~~~~~~~~~~~~~~~~~~~~~~~~~~~~~~
Case 16 Mar. 20, 2018
Breaking Through Ice Into Water — Considerations of
How to Avoid it and What To Do if It Happens:
1. Do everything possible to ensure your crossing is safe:
Is it a known crossing route? Is it known to be a safe route?
Is there sign of other people crossing recently?: If so, it should be reasonably safe.
Has there been warm weather recently or at present?: The ice could be thinner now.
Is there water on the ice, especially near shore?: That would indicate melting and weaker ice.
Is there any open water, especially near shore or rocks, logs, etc.?: Thin ice is indicated.
2. If all apparent factors suggest safe ice, proceed, but carefully.
3. Ideally if no direct surface view of ice thickness is available in the form of a clear ice window with suspended bubbles, take along an auger with a 20cm bit and drill holes at intervals: Otherwise an ice screw works very nicely: if a 10cm screw doesn’t break through, you can usually breathe easy.
If at least 10cm of ice thickness is found everywhere, you can relax and expect safe
ice in general, but keep aware for changes or unusual conditions of the ice, like cracks, bulges, wet snow, open water nearby, or creeks entering or leaving the lake within 100m
of your route. Any such observations warrant additional drilling or at least caution.
4. Use of skis or snowshoes is greatly preferred for crossing ice, as they distribute your weight and may prevent breaking through if you cross a thin patch.
5. The party should spread out to avoid pressure points on the ice.
6. At least one rope should be kept unpacked, and not be carried by the heaviest person.
7. The heaviest person should not go first, but rather be centred in the group or farther back, as he’s the most likely to break through and also likely the most difficult to rescue; also it may be advisable to have helpers in both directions, unless it’s a small group: 2 or 3 people, in which case it would be best for rescuers to work together, rather than individually.
8. However party distribution for travel on ice could be debated endlessly: if a lighter person goes first, he may still break through, and would then be easier for his team to rescue, and ‘from behind’; but a couple of lighter people may cross the weakest spot safe, before a heavier person breaks through, and then either need help from a split party or even from members on uncertain ice beyond the open water.
9. If someone breaks through the ice, he should first of all shed all his obvious encumbrances, including pack and skis or snow shoes. If by chance he has a rope too, he should first try to get that to his party still up on the ice, though obviously they should keep back from the broken edge, and keep away from each other.
10. It would be best if he can save his equipment by getting his skis and pack, etc. back on the ice, but a minimum of time and effort should be spent on saving equipment if there’s any difficulty in that: the most important task is to rescue the person from the water.
11. As a rule, it would be best for the victim(s) to retreat and be rescued in the direction from which the party approached the site of the break-through, as somewhat-stronger ice in that direction has already been practically established, whereas for all they know, it may be weaker in all other directions.
12. Breaking through ice into water is an extremely dangerous accident, and even more so when it happens to people on skis or snow shoes, as these load-distributing attachments allow people to travel far out on ice that’s too weak to withstand greater load concentrations: rescue efforts inevitably cause greater pressures on the ice near a break-through, with the increased chance of rescuers breaking through as well.
13. For the reasons mentioned above, all possible precautions should be taken to prevent an ice break-through accident. The suggestion of carrying and using an ice auger or screw to directly measure the ice thickness may sound laughable in advance, but would undoubtedly seem a lot more sensible to survivors of such an accident.
14. However, once in ice-cold water, a victim needs to get out of it as quickly as possible to improve his chances of avoiding death by hypothermia.
15. It would be best to retreat by swimming if necessary in the direction of approach, and using any available means to get up on the ice there.
16. The use of ice axes has been suggested and would likely be very effective, but rarely available. This is something to think about. I have personally on at least a couple of occasions worn crampons and carried ice tools as well as being tied in to a belay rope while crossing river ice.
17. Ideally a long rope pulled by team members distributed on the ice and far from the victim should be effective to help him get up on the ice and away from the edge, preferably far from it by dragging before attempting to stand up.
18. A technique has been demonstrated, of swimming by kicking the legs while supporting the body with the arms on the ice and squirming to get up on it. In such a case, if a rope isn’t available for help, the victim would be well advised to roll, then crawl, as far as possible from the ice edge before trying to stand up.
19. As well as making every possible effort to avoid this kind of emergency from the start, the advantages of having team support, pre-planning, and preparation are obvious.
20. Without dwelling on the disaster of an entire team ending up in the water and being unable to extricate themselves, or unfallen team members being unable to help those in the water, clearly the survivors need to move as fast as possible to safe terrain before stopping to ‘dry off’ : that may even be still well out on a lake, especially in the case of very cold or otherwise severe weather, or a great distance to shore.
21. A wide range of possible circumstances could happen, and the exact combination would dictate the best course of action for the survivors in each case: is there any dry or useful clothing or shelter available for the victim(s) to use? If there is, the team needs to think fast and sharp and decide on whether to set up a camp on the spot (uncertain ice?) or to move to a better location (eg., shore and forest where a fire might be possible, also better wind shelter). If everyone is soaked, it would undoubtedly be a desperate situation of everyone rearranging clothing to put the least-bad insulation next to the skin, and then traveling at speed (to generate some internal heat) to a better location or, if possible, to reach shelter or supplies or help.
Orvel
~~~~~~~~~~~~~~~~~~~~~~~~~~~~~~~~~~~~~~~~~~~~~~~~~~~~~~~~~~~~~~~~
Case 15, Feb. 23, 2018
Lake Ice: When is it Safe to Cross?:

The question of when a lake is safe to cross on its ice was raised recently by a Section party who traveled to Bow Falls. It must be in everyone’s mind when thinking of crossing any of the many lakes we find en route to mountaineering destinations in Winter, for example Bow Lake, Peyto, Eagle, Sherbrooke, Hector, Minnewanka, Louise, and Emerald, as breaking through ice into lake water is likely to be deadly, and a nasty incident even if you manage to get out and survive.
Before starting across any lake in Winter, keep the objective of safety in mind above all others, and learn to recognize the signs of danger: be aware of all factors around you that may affect the ice thickness and quality. This is particularly the case in early Winter and late Spring, when ice conditions are at their worst, so the potential for breaking through is the greatest. That makes it crucial to be able to recognize different ice conditions and learn how to avoid danger. Here’s an overview of things to consider:
____________________________________________
Freeze factors
There are several factors that determine ice thickness: the type of water, location, air temperature, weather history, water temperature, water depth, the size of the lake and the presence of underwater springs or currents, especially where creeks or rivers enter or leave the lake. But the first question you should ask yourself at the beginning or the end of the season is this: Has it been cold enough for a long enough period of time to create or maintain safe ice? If the answer is no, or maybe not, or I don’t think so, or I don’t know, then it’s a good time to think about going around, unless there’s evidence of plenty of recent traffic on the ice and no danger signs like cracks, heaves, holes, or water on the surface.
When you do approach a lake in Winter, size it up carefully before heading across. Naturally, you’ll be suspicious of it if it seems that no one has gone across before you. Look for any clear ice, where you may be able to get an idea of the possible thickness range — that’s because the ice thickness varies from place to place, so 5cm ice may be the thickest there is, with dangerously thin shell elsewhere, or it may be the thinnest in that spot because of a spring below, with solid 15-20cm ice everywhere else. Look for cracks on the surface: they can be a sign of instability. Water lying on top of the ice is obviously the easiest indicator of melting, but it may also have been pushed up through cracks by someone or something traveling on the ice. In most cases, ice will melt along the shoreline edges first, due to solar heating in the shallow water there.
Be careful around logs, rocks and docks—they also absorb heat from the sun, which melts the surrounding ice that much faster, or causes it to form much more slowly. If the ice is mushy or soft at the edges, stay off it. Don’t try to jump over soft ice with the hope of landing on good ice. The good ice may be farther than you think, if it’s there at all.
____________________________________________
Ice Colors:
It’s also important to consider the color of the ice. Clear or blue ice is the strongest and safest. It forms when the temperature has been at least -8ºC for three consecutive weeks. The lower the temperature, the faster ice forms. At a thickness of 12 inches, blue ice will support even a larger vehicle like a mid-size pickup truck.
Opaque white ice is half as strong as blue ice. It’s formed by wet snow freezing on top of existing ice. About the same as alpine ice, it’s most dangerous when it forms on top of ice that hasn’t completely frozen. When that happens, the ice below takes longer to freeze and turn into blue ice. During early Winter and Spring snowstorms, opaque ice is notorious for covering up dangerous thin ice. Use extreme caution when going onto snow-covered ice. It would be best to check the thickness often with a drill, but of course, mountaineers rarely carry one. However an ice screw works very nicely: if a 10cm screw doesn’t break through, you can usually breathe easy.
Dull grey ice is the least safe, because it’s deteriorating. The grey coloration indicates the presence of water in the crystal structure of the ice, meaning it will not have good internal bonding or support much weight. Grey ice is most common during the Spring melt, although it can be found all Winter long near moving water, such as where creeks and rivers enter or leave a lake. These same areas also often have underwater currents that can make ice thin or create air spaces under the ice that will reduce its carrying capacity, so avoid them. No objective is worth the risk of falling through.
The body of water you plan to cross may be covered with ice, but is it thick enough to support you? According to the Lifesaving Society, clear blue ice needs to be at least four inches thick to support a walking person.
_________________________________________
Safeness vs. Ice Thickness: Clear or ‘Blue’ Ice
_________________________________________
Less than 3 inches (7.5 cm): Stay off
_________________________________________
3 to 4 inches: OK for Skiing
_________________________________________
4 inches (10 cm): OK for Walking
_________________________________________
5 inches (12 cm): OK for a Snowmobile or ATV
_________________________________________
8 to 12 inches (20 to 30 cm): OK for a Car or small pick-up
_________________________________________
12 to 15 inches (30 to 38 cm): OK for a Mid-size pick-up or van
_________________________________________
SUMMARY — What YOU need to know:
1. There can be no formula for ice safeness. Ice is a complex medium in an even more complex environment, so on-the-spot inspection and experimentation is the only reliable way to know its condition at any time. Note that similar conditions can easily occur at times a month or two different from one year to the next.
2. There are two main broad characteristics of ice that determine its strength; the first is its thickness, but on its own, thickness must be considered cautiously.
3. The other broad strength characteristic of ice is its type, as discussed above.
4. However, now that you know what to look for as safe ice, you STILL need to know what you actually have, at the time you want to cross: that’s the real problem. As mentioned before, you’re lucky if you can find a bare patch of clear ice and you can see how thick it is, but if the ice is not clear, as if you dig down to a rough surface, you may have no idea of the ice composition or thickness unless you chop or drill down through it. It may have several layers of different types and total thickness.
5. Finally keep in mind that the ice strength varies along your crossing, and beware of factors that could make it weaker ahead; periodic actual measurement and direct observation along your route would be the most reliable way to assess the ice strength, but again, that’s almost never done: we usually rely on someone else to go across first in the Fall, then get very nervous about skiing through water lying on the surface in the Spring.
Orvel
~~~~~~~~~~~~~~~~~~~~~~~~~~~~~~~~~~~~~~~~~~~~~~~~~~~~~~~~~~~~~~~~~~~~~
Case 14, June 1, 2017
Tick Alert:
Hello Climbers; Our annual tick season is well underway, and I hear a few people have seen them already, though the spring seems a bit late this year because of lingering cool and wet weather — which keeps the bugs in hiding. We consider tick season to be May and June; and though they may occasionally be seen in other months, this is their prime hunting season.

Wood Tick
Ticks are nasty little flat beetles of the spider family (8 legs) that come out in force at this time of year to look for blood from anything that moves, to continue their life cycle. Unfortunately they are known to carry a variety of diseases to such hosts — especially humans. They allegedly carry Rocky Mountain Spotted Fever, Lyme Disease, Babesiosis, Leptospirosis, and Powassan encephalitis, among others with similarly-impressive names. A large volume and variety of information about ticks can be found these days, especially on the internet, and much of it seems contradictory or sensationized, but it’s clear that ticks should be avoided, so the main things we should know about them are what they look like, how to avoid encounters and shorten any exposure to them, and what to do if we get bitten.

Tick Full of Blood, Note Remarkable Size
After 4 Days Of Feasting
Luckily our western Canadian ticks, called wood ticks, are slow- moving although tenacious. They can often be seen crawling on rock outcrops or in the grass, or waving to us from leaves as we pass by. The notion that they never climb higher than 6 inches above the ground is a myth. They may get on to a person from the ground or a climbing rope, etc., or drop in from bushes. They are most often about 4mm or 3/16″ long and come in various colors from tan, through reddish brown, to dark brown and almost black, and are easy enough to see on solid-colored clothing, especially light colors.
‘Our’ ticks often take some time to decide on a place to bite, so we often find them still crawling around on us while driving after a climb or a hike, or even at home. Repellants likely have questionable merit against ticks because they may board us from any direction and have been seen to ignore a wide range of chemicals.
So our advice is:
1. Avoid sitting or lying on the ground or grass in May and June,
2. Keep always mildly alert for ticks on your surroundings, party, and self, but in any case
3. Diligently check yourself, your clothing, and your equipment for ticks after every outing, especially to the foothills and mountains.
4. If you find a tick, don’t throw it out the window, it may start a new colony — crush or burn it.
5. If you find a tick embedded in your skin, you have several options but those don’t include ignoring it, as it may already have infected you with a troublesome ailment, so take it seriously if it seems to be biting into your skin.

Imbedded Tick
6. A variety of advice has been given for removing a tick, the focus of concern being that its mouth parts may be left imbedded in your skin or flesh if the tick is pulled off forcefully. I have personally had a few close encounters with ticks, and I have always simply pulled them off, though carefully when imbedded. One more sophisticated technique that claims to be infallible uses a Q-tip and dish detergent: the tick is dabbed with detergent and then the Q-tip is rolled against the tick, which reportedly becomes entangled in the swab and comes away — but I haven’t tried this.
7. The Canadian medical community has started to become interested in ticks and the diseases they carry, especially Lyme disease, in the last few years, so if you think your tick has gotten through your skin, you may want to bottle it and see if you can find a sympathetic doctor who may send it away for analysis and possibly prescribe an antibiotic for you, even if no infection is evident. In any case, at least treat the bite site with alcohol or other antiseptic.

Serious Tick Bite After Tick Removal
8. If the bite site has redness or other discoloration, an infection is indicated, so it’s definitely advisable to see a doctor for treatment, and if possible, lab analysis of the tick. One article I found actually says that a red bulls-eye inflammation around a tick bite definitely indicates Lyme disease, though I seriously doubt that. However it likely does indicate some infection and calls for medical treatment because of the seriousness of the diseases carried by ticks. Many of us know someone who has had or continues to have serious and persistent health problems that have been traced back to a tick bite years earlier.
Orvel
~~~~~~~~~~~~~~~~~~~~~~~~~~~~~~~~~~~~~~~~~~~~~~~~~~~~~~~~~~~~~~~~~~~~~
Case 13, May 27, 2017
Caution re. Cornice Hazards:
After a few avalanches were reported this winter implicating cornice collapses, one of our members suggested we mention this separately as a significant alpine hazard.
Although cornice-fall may seem to be an obvious danger in mountain terrain, both winter and summer, statistical information about it would be very difficult to compile, and even then likely difficult to describe or summarize in a useful way. But we can at least consider some of the mechanics of cornice formation and collapse, some of the effects of a cornice fall, and precautions.
1. Definition: A cornice is a mass of snow accumulated through deposition by wind action at a terrain crest, which is typically some sort of cliff edge, in such a way as to hang over other terrain.

How a Cornice Forms
2. Cornice Formation: Cornices form on the lee side of a crest by wind transport and deposition of the snow. During formation, small mini-cornices are continually breaking off at the formation edges as their weight exceeds the tensile strength capability of the snow under the current conditions. As the snow deposits in depth, the tensile strength needed in the top layers decreases, and presumably the deposited snow is typically bonding internally, giving it greater tensile strength, so these combined effects allow the snow to ‘grow’ continually to the lee and protrude beyond the previous edge in spite of any mini-collapses happening nearby in the meantime. Cornices also form over crevasses: a snow bridge is the end result of cornice formation that reaches the lee side of the crevasse.

Typical Cornice Cross-Section
3. Cornice Support: As a rule, a cornice is not entirely supported by compression forces, as there is no snow or other material directly below some part of it; support for ‘overhanging’ parts of a cornice must be provided by a combination of horizontal tension in its upper levels, horizontal compression in lower levels, and a vertical shear force in the area above the terrain crest and piled snow/ice. The upper snow ‘pulls’ the cornice top toward the cliff; the lower snow pushes the cornice bottom away, thus maintaining an equilibrium in the forces created by the weight of the cornice. The problem with such a structure in this case is that snow is weak in tension, and if the bulk tensile strength needed in the upper snow connecting the cornice to the snow ‘on land’ is less than the tension created by the weight of the cornice, the snow ‘pulls apart’, ie., it fractures, and the cornice falls.

Cornice May Break Well Back from Cliff Edge
4. Cornice Life and Death: Over time, both during cornice formation and afterwards, all cornices are subject to prevailing weather conditions and may either grow or collapse, or grow until they collapse under their own weight. A heavy snowfall may deposit enough extra weight on top of a cornice without providing extra strength, until the tensile strength of the upper layers of the cornice is exceeded; also in some cases the compression strength of the lower layers of the cornice may be reduced by the action of air rising up the ‘cliff’ and affecting its underside, by either melting or vapor transport, whether causing metamorphosis or sublimation — the snow becomes ‘hollow’, and so weaker, and crushes when its strength drops below the compression force caused by the weight of the cornice, and the cornice falls.

Weakening of a Cornice by Warm Air Rising Up a Cliff
5. Special Caution at the Inner Edge of Cornices: Most of us who have been on mountain tops or ridges where cornices project from the solid ground have seen holes right through a substancial cornice at a cliff edge. Such holes are caused by air rising up the cliff below, and many people have fallen through them after seeing the massive cornice projecting far out and presuming the snow to be solid for some distance.

Cornice Melt Holes Above a Cliff
In such cases, obviously the cornice is supported by enough virtual ‘snow beams’ as described in 2. above, plus often massive pillars resting on terrain projections from the uneven cliff face below, although honeycombed along the edge of the ridge.
Types of Cornice Hazards:
1. Falling Through, or Cornice Collapse Underfoot: Various considerations should be of interest to mountaineers operating in the vicinity of cornices. One already mentioned just above is the hazard of falling through or causing the collapse of a cornice underfoot; mountaineers on mountain tops and ridges should be wary of the snow they’re walking on. Generally if there’s rock all around, the snow is likely above rock. Especially suspect is snow along a ridge, where rock is seen before and beyond, and to one side of a particular patch of snow: the snow may be a bridge over a sharp gully penetrating the cliff below as far as the rock seen to one side, ie., right across your path. Continual probing of the snow with an axe or ski pole on mountain tops and ridges is a very good idea. Another good idea is being roped up, even when it appears unnecessary in such terrain.
2. Cornice Fall from Above: The original motivation for this discussion was the danger of avalanches caused or increased by cornices. A cornice may contain enough snow in itself to pose a significant hazard on the slopes below or even in the valley. Large cornices are sometimes even seen overhanging ‘dry’ mountain slopes and so tend to be ignored by people in the valley. Climbers ascending dry slopes or a gully below a cornice may pay more notice to it but could easily dismiss it because it doesn’t look big enough to worry about ‘from here’; yet most cornices eventually fall at some time during a summer and although they look small from a distance, they may have enough material in them to spill far down a slope, especially picking up boulders and other debris along the way.
3. Underestimating a Slope Angle: A common tendency connected with the hazard of a cornice avalanche is that of underestimating the angle of a slope, especially in summer when terrain unevenness like rocks and dips and bushes may give the impression of being able to absorb an avalanche. In fact such a comfortable-looking slope may act as an efficient chute for an avalanche, especially one starting at high energy and speed, while taking out very little of its material along the way. And so a major portion of a fallen cornice may sweep well down even a ‘gentle’ slope and even reach the valley hundreds or thousands of feet below.

A Semi-Stable Slope may Propagate a Cornice Avalanche Directly Downslope While Nearby Snow Stays in Place
4. Semi-Stable Snow Slope Triggered by Cornice Fall: The main concern with cornices for winter mountaineers is that of a snow slope being triggered by a cornice fall, because of the immense volume of snow often spread innocently as even a modest cover but over a large area that could potentially be released. Climbers who have studied the avalanche reports and forecasts and so feel confident that the snow is stable — especially after probing and digging pits — may still find themselves in an avalanche triggered by a cornice fall onto the top of a slope that wouldn’t have released spontaneously or even by their moving over it. The tremendous energy of a mass of cornice falling vertically onto the top of a semi-stable snow slope may be enough to clear the slope below it to the valley. We have often seen conical avalanche tracks on uniform-aspect flat mountain slopes, with the top of the cone just below a gap in a cornice at the top of a cliff. Such a case clearly indicates that the falling cornice actually caused the avalanche, as the slopes to either side did not release, even with the chaos happening next door: ie., the snow on the slope was relatively stable — enough so to resist significant triggering — while that directly below the cornice input, went to the valley.

Stable Snow May Stop an Avalanche Started by a Cornice Fall
5. Stable Snow Slope Controlling a Cornice Fall: However, we also often see cases of isolated ‘track’ avalanches running only partway down a slope that appears generally uniform in angle and aspect; such tracks often start just below a cliff, whether corniced or not: they indicate triggering by an external input like a falling rock or a cornice, that had enough energy to release the snow where it fell, but the slope was stable enough to not only resist triggering lower downslope, but also to absorb the kinetic and potential energy of the snow coming from above; ie., the lower snow slowed and stopped the avalanche.
Unstable Snow Slope Cleared by a Single Cornice Fall Impact
6. Unstable Snow Slope Triggered by Cornice Fall: An even worse case, and more catastrophic, is that of an unstable snow slope — prime for triggering — being released by a cornice fall. In that case an entire snow slope, even far to the side, might be released by the collapse of even a small cornice.
Causes of Cornice Collapse:
The factors causing cornices to collapse are similar to those preceding many avalanches: heavy snowfall, high temperatures, and strong wind especially at melting temperatures. In this regard mountaineers should keep in mind, for example, that the ‘weather’ 1000 metres above them may be very different from their experience in the valley bottom; they may be skiing along in shadow and a low temperature, and believing the snow is stable, but the sun is already well up at cornice level, and with a strong convection wind blowing upward under the cornices, they may be approaching failure and falling onto snow slopes below them, threatening the slopes and valley.
SUMMARY:
Cornices present common alpine hazards that are often taken too lightly. While most mountaineers are aware of cornices in a general way, they may not give them due respect, for example not realizing that in effect, the stability of a snow slope should be down-rated in the presence of cornices threatening it. The death of 5 people in an avalanche in B.C. early in 2017 apparently resulted from the collapse of a cornice that they were all on at once.

Cornice Safeness May be a Matter of Scale
It’s possible that they were aware of cornice hazards but misjudged how far back from the edge a cornice might break.
We can only advise alpinists to be cautious at all times of the wide range of alpine hazards, including cornices.
Orvel
~~~~~~~~~~~~~~~~~~~~~~~~~~~~~~~~~~~~~~~~~~~~~~~~~~~~~~~~~~~~~~~~~~~~~
Case 12, April 18, 2017
Safety On Icey Trails:
Especially in the Spring time, we hikers and climbers are often scrambling up steep hills and trails to gain some height and exercise, and we find the melting snow and residual ice from winter make the footing tricky. I often see people streaming up the hills like Yamnuska, Heart Mtn., Ha Ling, Barrier, or Prairie Mtn. — wearing only running shoes or bare hiking boots, and taking their chances with the ice, or the frozen ground off to the sides. Occasionally they can be seen limping down, or with muddy bums, or bloody knees or elbows.

Street Creeper
I’m sure no one ever breaks an arm or leg, but that could happen too, and all quite unnecessarily, as a wide range of very effective traction aids can be bought for typically only 20$ – 70$. Names like Yak-Trax, Ice Creepers, Micro-Spikes, and Ice Trekkers come with these products that help us to stay upright and safe on frozen trails, or smooth ice for river-bed hiking and approaches to ice climbs. And they work very well.

Tougher Creeper

Ice Trekker
But on the spur of a moment, effective traction aids can also be improvised at home. One of our members installed studs in the soles of his mountaineering boots, for example.
I once devised a couple of sets of boot chains before going out climbing up Cougar Creek when I knew the valley approach included a lot of bare ice at that time.
Some of the participants didn’t have grippers other than their crampons, but they’d be unwilling to risk their crampons in the rocks and gravel of the valley.

Homebrew Boot Chain
The grippers I made were sections of figure-8-link hanger chain, each about 18in. long and matched with a short bungee cord, about 15in. long — you need to experiment a bit for your own size and boots, otherwise a bit longer is better than too short — knots can be tied in a bungee cord to use up extra length.

Chain Loop Locked with Bungee Cord
The chain goes around the widest part of the front of your boot, held in place by the notches between sole lugs at the edges, and with the ends above the laces: one end-link pulls through the tightest possible link in the other end of the chain; one hook of a bungee cord is clipped through the link that pulled through, locking it off, then the bungee goes around your ankle and back to clip on to itself or the chain.

Simple but Rugged and Effective
When using these, you need to concentrate to put weight on the chain when on ice, but that soon becomes automatic, and this simple arrangement is surprisingly (very) effective, as well as cheap or free if you happen to have this kind of chain and bungee cords, or equivalents, available.
But the point is: Why risk injuries on the slippery trails when so many ways are available to avoid them?
Orvel: See also “Mega-Spikes” in the ‘Articles’ section.
~~~~~~~~~~~~~~~~~~~~~~~~~~~~~~~~~~~~~~~~~~~~~~~~~~~~~~~~~~~~~~~~~~~~~
Case 11, January 27, 2017
CAUTION using Commercial Utility Rope as Accessory Cord for Climbing, eg., Prusiks and Rappel Slings:
Over the last couple of years I’ve noticed a new type of utility rope and cord has appeared in hardware stores, etc. that may look good to a climber but is dangerous. Practical climbers like myself who have often gone to RONA, Lowes, Wal-Mart, or Home Depot in the past to buy cheap leave-behind cord need to be aware of this in advance, so they don’t learn it by accident.

Typical Junk Cord Offered at Hardware Stores — Looks Like Climbing Cord
That kind of cord looks like regular UIAA-Approved kernmantle and comes in many attractive colors, but is instead a poor woven sheath over a bundle of something like paper towel — with very little strength. A 1/4″ or 6mm cord likely wouldn’t hold anything near 100pd or 45kg, a 5/16″ or 8mm cord might hold a bit more than 100pd … or maybe not.
Two Kinds of Bad Hardware Store Cord, Showing ‘Paper Towel’ Filler
In any case their strength is far below forces typically exerted in static use during climbing or descending, so such cords must be considered junk, and completely rejected for any practical use at all; I don’t even want it around home, as for bundling or tying down loads: I’ve had it pop while snugging down a load with a simple cord-through-loop pulley system.
Although standard instruction and advice in climbing is to use only UIAA-approved cords and ropes for all uses in climbing anyway — so why bring this up?:
Your Reassurance of Quality Climbing Gear
some climbers will use industrial cords especially for rappel slings because of their low cost and so expendability, and their faith is well placed in the case of many commercial rope products, especially shiney twisted-strand ropes of nylon or polypropylene. 
Conventional Twisted Synthetic Hardware Cord: Usually Very Strong, Tough, Reliable
These (at left) are usually extremely strong and reliable, but in general everyone is advised to inspect and select cord for climbing accessory use very carefully, and ideally test it in a safe application before using it for safety, if uncertain.
Orvel
~~~~~~~~~~~~~~~~~~~~~~~~~~~~~~~~~~~~~~~~~~~~~~~~~~~~~~~~~~~~~~~~~~~~~
Case 10, November 27, 2016
How to Secure a Flat Rappel Rope Joining Knot, Using Only the Rope:
I prefer and recommend the use of a metal base ring with flat knots as I described in Case 7 (below) but such a ring is an extra piece of equipment that’s easy to forget, miss, or lose. By all means carry one, but in case you don’t have it along when it comes time to rappel, when you still prefer to use a flat knot for joining the ropes, while remembering reports of flat knots slipping, or rolling along the tails until the ropes came apart, here’s how to secure it — using only the rope:

Flat Fig. 8 Showing Tails Lean One Way
The two tails usually tilt in the direction of one rope or the other: make a half hitch in the rope in that direction and close to the knot, and pull the two tails through it. Snug up the half hitch against the flat knot, and carry on with your rappel, that’s all there is to it. (If the tails don’t tilt, use either rope.) Tails should follow the knot when pulling.
Flat Fig. 8 Secured With Half Hitch
The result is nearly as ‘flat’ as without the half hitch — ie., it is flat — while the hitch STOPS any tendency of the knot to invert or creep under tension. It won’t come apart in a rappel !

EDK Secured With Half Hitch
I tested this method with a Flat Figure 8 in old 9mm ropes up to 1700pd (=770kg or 7.6KN) when one rope broke at a tensioning shackle, but the half hitch and the joining knot remained intact without rolling or inverting. After tensioning, the half hitch was loose and easily untied, but the Fig. 8 flat knot was very tight, which isn’t surprising in view of the great force I applied to it. (Rappel tension is typically only about 1/20 of that.) But I still untied it by hand in a few minutes. Don’t risk your life with an unsecured rappel knot!
Orvel
~~~~~~~~~~~~~~~~~~~~~~~~~~~~~~~~~~~~~~~~~~~~~~~~~~~~~~~~~~~~~~~~~~~~~
Case 9, October 29, 2016
Dropped Gear: Is It Safe to Use?:
I just noticed a comment on this subject in the Main Club news, and a reference to “Rock and Ice” magazine, where it was expanded: “Is Dropped Gear Safe?” It seems to me that the consensus was that dropped equipment is likely safe – therefore you should not use it: WHAT?!

Is It ‘Safe’?: This One, Yes.
‘Years ago’ when I was most keen to learn all I could about climbing, I had a running debate on this, with a good friend — a good climber. ‘Al’ was fascinated by the well-documented ideas of strain-hardening/stiffening and micro-fractures in aluminum, and became almost paranoid about ANY impacts on his aluminum climbing hardware: for example, he would scream at anyone who innocently tossed his carabiners on the ground beside him while sorting gear after a climb, and would never use dropped equipment, even a carabiner dropped on rock from waist height. I suggested he was going overboard about it, that in fact dropped equipment is just fine unless it’s seriously notched by an impact, and I had no qualms about using equipment found below a climb.
However, Al segregated several items of dropped gear that he would not use: they included 5 carabiners that he kept in a jam can. I proposed that since they were useless anyway, we should abuse them seriously by ‘dropping’ them, and then have them tested. So we took them down to my basement and hurled each one as hard as we could into a concrete floor-corner — ten times, taking turns.
At that time, Kevin O’Connell was Director of Safety of the ACC. He did a lot of tension testing of various equipment as part of that position: when he came to visit the Calgary Section, Al and I approached him to test those carabiners, and that’s the last we heard of them for some time. But a few years later, I asked Kevin whether he ever tested them, and how that turned out. He paused and then said, “OH, THOSE carabiners? — no I never actually tested them, but I’ve been using them all along in the chain for testing everything else, and none of them ever broke!”
And that’s good enough for me: what constitutes ‘proof’? In a case like this, climbers all have their own opinions. O’Connell’s ‘results’ definitely had to impress my friend Al, but I expect he still wouldn’t use dropped equipment. I do.
Orvel
~~~~~~~~~~~~~~~~~~~~~~~~~~~~~~~~~~~~~~~~~~~~~~~~~~~~~~~~~~~~~~~~~~~~~
Case 8, July 26, 2016
How to untie a Double Fisherman Bend Joining Knot:
The Double Fisherman Bend (a.k.a. DFB) has been called “The Gold Standard” for secure joining knots, specifically for tieing ropes together for rappelling. It has a long-established history of reliability in all conditions and can be used for safe joining of lines of any different diameters. However nowadays it’s often considered ‘old-fashioned’, hence not cool, not good. The usual reasons given for shunning it are that it’s not a “flat knot” and so may snag during rope retrieval, and that it’s difficult to untie.
The issue of ‘snaggability’ is a questionable concern and has been covered below, in Case 5; the issue of difficulty of untieing is solvable by just learning a good technique:

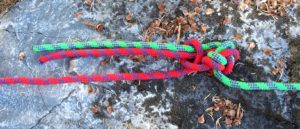
The Double Fisherman Bend Joining Knot
The ‘DFB’ often becomes hard to untie after rappelling because it tightens under load AND consists of two separate knots jammed snug against each other: that prevents access to one side of each double-overhand knot (DOH), which is a problem for untieing them, according to Case 6. below.

Squat and Pull the Tails to Spread the Two Halves
The SOLUTION is to first pull the two halves of the DFB apart: to allow for that, leave both tails of the DFB at least 30cm or one foot long when tieing the ropes together; then for untieing the knot, grip one tail in each hand braced on the outsides of your respective knees, and use the strength of your legs to pull the tails apart by squatting.

The Two Halves Separated at Least 8″ or 20cm.
It’s good to separate the two double-overhands by about 20cm — that gives you access to the ropes at both sides of each knot:
Now pick either double overhand and push its rope-ends (viz. the tail and the main rope) into it, as described in Case 6. and shown below.

Loosening the DOH by Pushing the Rope Into it from Both Sides
That double-overhand will readily untie, and then either that rope can be pulled out of the other double-overhand, and so loosen it, or the second double-overhand can be untied in the same way.

Pulling the Untied Green Rope end Out Through the Red DOH to Leave it Loose and Easy to Untie
NOTE: my experience is that much of the tightness of the DFB after rappelling is a result of the original tightness — when it was tied — so tieing it snug but not tight will make it easier to untie after rappelling. This is one knot where the “Tie it Tight” rule does not apply: one tester repeatedly tied the DFB badly in every possible way so that he could still barely call it a Fisherman’s Bend before testing, and in every case the knot still held, and the rope broke at its ultimate strength.
Orvel
~~~~~~~~~~~~~~~~~~~~~~~~~~~~~~~~~~~~~~~~~~~~~~~~~~~~~~~~~~~~~~~~~~~~~
Case 7, July 16, 2016
An Easy Solution to Your Flat-Knot Concerns:
Put a Ring on It. Lately much has been made of the potential for some flat knots to roll or invert or capsize under load, sometimes repeatedly and consuming the tails until they come apart, obviously often with deadly results. Such incidents are rare and the indicated common causes are sloppy knots, mixed rope sizes, short tails, and bad weather or environment: snow, water, or mud which make the ropes slippery. However the unavoidable feature of all flat knots that can only aggravate a tendency to come apart under load is the opposite loading of a common opening in the knot by the two ropes. That prevents the knot from tightening and actually works to spread it on one side.

Possible Flat-Knot Rings
This common adverse feature of flat knots can be completely defeated by the use of a small metal ring at the base of the knot — a 1.5-in link from a transport chain is ideal for this purpose — middle ring shown above: size of the opening is about 1.25″ X 0.5″ — they can be obtained by sawing through alternate links in a chain, but are otherwise indestructible, and can of course be used repeatedly. The smaller link at left would work better for smaller ropes; the quick link at right may work with larger ropes but doesn’t restrict the spreading effect as well — to be avoided.
The two tails are first fed through the ring and then the knot is tied in the tails beyond the ring.
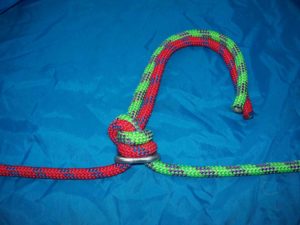
EDK With Basal Ring Keeper
The ring prevents the ropes from spreading the knot; it may be round or oval or other shapes but must be small enough to prevent any part of a knot from pulling through it, and strong enough to support at least 2 times the body weight of a person. (This recommendation is discretionary but should be fair: in fact, during rappelling, the ring will normally need to withstand a maximum of only about half of the rappeller’s weight.)

Rap Ring Won’t Work: Slips Over the Knot
A standard 1.5in or 3.8cm rappel ring is not suitable — too large; it can slip over the knot.
Tension tests with these ring keepers are currently being done to verify their effectiveness, but so far the results are STUNNING: an EDK, a flat Fig. 8, and a flat Double Overhand were all tested to more than a ton of tension without rolling or capsizing, and of course the ring remained intact. Please guarantee your rappel knot safeness by securing it!: this is one way to do it.
Orvel
~~~~~~~~~~~~~~~~~~~~~~~~~~~~~~~~~~~~~~~~~~~~~~~~~~~~~~~~~~~~~~~~~~~~~
Case 6, July 10, 2016
Untieing a Knot:
This should not be a complex topic, so we haven’t done a long search or research on it. But knots are such an important part of our systems and equipment that surely climbers should also be good at untieing them. Still we see some surprising things during attempts to undo rappel knots (for example), even among experienced climbers. Cursing usually doesn’t work.
(In rare cases, tools may be needed, but we prefer to avoid the use of tools and so the possibility of damage to the ropes.)
1. Typically, a knot tightens because of the opposing actions of two rope strands: each one braces the knot against the other one so that the knot tightens around both strands, though that’s not as much the case for a flat knot, which is partly kept from tightening by the rope tension acting in opposite directions on an opening in the knot.
2. For untieing any knot, the general rule is to try to reverse the action that tightened it, viz., push both strands in to the knot at the same time and so against each other.
3. For a ‘Flat’ Knot, the two “strands” mentioned above are not in general the main ropes but rather two PAIRS of strands on opposite sides of the knot: hence two strands or two pairs of strands should be pushed into the knot and so against each other from opposite sides.
4. The above action may be awkward if the knot is asymmetric, as the knot will try to escape to one side as you do that: however in that case the knot must be held in position by bracing it against a solid object: your knee, the ground, or a tree or rock, etc., as you push the strands into the knot.
5. Often you can enhance your efforts to push the rope strands into the knot by using repeated brief and hard pushes (pulsating) instead of a steady force. Several pushes may be needed before you notice the knot loosening, so persist until you do, and even then continue for a bit, and often the knot will become quite loose and then easily opened up by pulling the tails out of it.
6. Some knots need other techniques for untieing them, so pay attention when you see such a special case, and spend a moment to try to understand why it’s different and come up with a solution on the spot. That may save you a lot of time, especially when you encounter the same or similar situations in the future.
7. Flat Knots tend to be easier to untie than inline knots are, simply because they are kept from tightening by the ropes where they enter the knot. However the rope tension acts to try to turn such a knot inside out by pulling the far side of the knot through the active opening, which has actually been shown to happen in some cases: not a good thing.
Orvel
~~~~~~~~~~~~~~~~~~~~~~~~~~~~~~~~~~~~~~~~~~~~~~~~~~~~~~~~~~~~~~~~~~~~~
Case 5, June 28, 2016
CAUTION Regarding Rappel Knots:
Subject 1 — Joining Knots for Rappel Ropes: Rappels have contributed a large portion of the record of accidents through the history of climbing, and a significant portion of rappel failures have involved the accidental separation of ropes at connecting knots.
Naturally climbers would like to find an ideal joining knot, viz. one that will never come apart accidentally, while also satisfying some other requirements that include adequate strength, freedom from troublesome jamming during rope retrieval after rappels, and ease of untieing.
Adequate strength refers to the well-established fact that every knot weakens a rope by generating pressure concentrations at bends and constrictions. Uniform ropes invariably break at knots or anchor rings when tested, and each kind of knot has been shown to cause a consistent narrow range of strength reduction — generally from 30 to 50%. However for the purpose of rappelling, considering that the typical body-weight loads are insignificant by comparison with the full strength of climbing ropes, the weakening effect of joining knots can generally be ignored.
Ease of untieing is a convenience, but may also be related to a tendency for a knot to open or come apart accidentally as well. In any case every knot can be untied, and every climber is advised to consider and practise various methods to make that easier.
As for the tendency of joining knots to jam during rope retrieval, at cracks, trees, edges, etc., a lot has been made of the villainy of certain of the most reliable knots — possibly far too much. That has led to the invention and adoption of a whole class of special-purpose joining knots that allegedly don’t get stuck as easily, mainly so-called “flat knots” that protrude on only one side of the line of the rope, leaving the joined ropes to run smoothly over the terrain by sliding on the side opposite the projecting knot, where the terrain-contact sides of the ropes are straight in line, without any projecting parts that could snag on a terrain obstacle: eg., a lip, edge, or root.
The worst kind of snag happens when the rope pulls the knot into a crack that narrows until the knot is too big to go all the way through it, and so gets stuck: in that situation, flat knots get stuck just as readily and badly as inline knots.
A Flat Knot is actually an end knot tied in both ropes as one, or a combination of end knots, so as to act as a joining knot. These have been discussed, tested, and used for at least 15 years. The disturbing feature of flat knots immediately noticed with dismay by every knot fancier is that because the ropes run into the knot together, when they are separated and pulled in opposite directions as during rappelling, they obviously apply a spreading force to the knot.
Some Basic Flat Knots
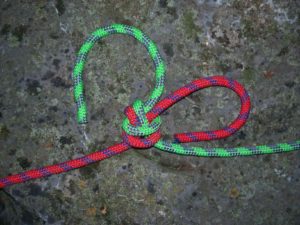
The “European Death Knot” or EDK: The simplest possible of the flat knots is the Single-Overhand: The ends of both ropes are held together and tied as one in a single overhand knot — specifically the tails are brought around in a circle to cross the standing part of both ropes ONCE and then fed through the loop thus formed. This is sometimes incorrectly called a Double-Overhand because of the two ropes, but in the case of knots, “single” and “double” refer instead to the number of turns of the rope . The EDK is a Single Overhand knot because it consists of a single turn of the ropes with the (twin) tail pulled through it. This knot has become very popular and has been shown to be reliable when well tied and in dry conditions, so the “death knot” designation likely sprang from a natural perception that this knot may be too simple to be trustworthy — but that may be a valid concern. In fact, when tested, the knot rotates and rolls toward the ends of the ropes, though usually only under high loads. However, at least one report tells of the tails sliding dangerously in to the knot during a rappel in winter conditions, and accidents, including deaths, have been blamed on it — though not necessarily confirmed.
OM: I have personally used this knot several times and ‘felt good’ about it in favorable conditions, but also consider it suspect for slippery conditions: wet, snow, ice, mud — because of its minimal internal contact area (and so . . . friction) in comparison with all other knots.
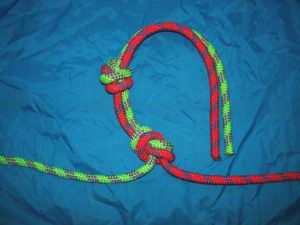
Backup Knot with EDK, Separated
Many climbers have adopted the use of backup knots with flat knots, but note that a backup knot contradicts the original purpose of flat knots, which is to minimize a tendency to snag during retrieval: a backup knot increases the profile of the knot and so is likely to aggravate snagging.
Note: in the picture above, the backup knot is shown ‘away from’ the EDK for clarity, whereas in practice, it may otherwise be tied snug against the main knot, whether EDK or Fig. 8 or other flat knot.

Stacked EDK and Backup Knot
However, the spread arrangement shown first above would be instructive in use, as it will reveal any slippage or rolling of the main knot.
The Figure-8 Flat Knot: 
This knot is simply a figure-8 tied in the ends of both ropes as one. When snugged up and all ends are pulled tight, it displays a reassuring locking structure — see second picture, below, where the tails act as a lock pin, keeping one loop from pulling through another loop — but a number of accidents have implicated it: when loaded, it can invert repeatedly, potentially off the rope ends. However, tests show that the loads needed for that to happen are very high when the rope is dry and the knot is tied well.
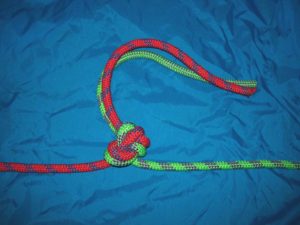
Fig. 8 Flat Knot, Tight
The true Double-Overhand Flat Knot: I have still found no reference to this knot in online forums and other publications, but have used it myself and feel that it’s reliable.

Double Overhand Flat Knot
I mention it mainly because its name appears often, but is always used for some other knot: both rope ends are tied as one, into a double-overhand end knot — specifically, the tails cross the standing part TWICE before being pulled through the four loops so formed.

Tieing the DOH Flat Knot
As with all flat knots, it must be tied carefully with parallel strands, tails at least a foot or 30cm long, and all 4 strands pulled tight individually.
A ‘New’ Flat Knot strongly resembling a Double Fisherman: It’s actually stacked individual double overhand end knots tied in two ropes as a flat joining knot and can be usefully called a Half-Reversed Double Fisherman Flat Knot or HRDF:

HRDF
Instead of overlapping the two rope ends as for tieing a Double Fisherman, lay them together as for most flat knots, and tie a double overhand around one of them with the other, leaving more than a foot of tail in the knotted rope; then tie the other (straight) end around that tail in another double overhand knot, again leaving about a foot of tail in the second knotted rope. The result is identical to a Double Fisherman except that in this case both tails come out of one end of the combination, and both ‘standing parts’ (= main ropes) come out of the other end:
This knot has allegedly been tested and showed no tendency to roll, invert, or capsize. If so, it could be a candidate for the ideal rope-joining knot award, although it does have a significant profile.
Other Flat Joining Knots are possible, and all have or appear to have the unsettling appearance of being pulled apart by the ropes, as these do. At least some flat knots show disturbing behaviors when loaded, and have been implicated in a number of rappelling accidents and deaths. And all for the stated purpose of providing for trouble-free rope retrieval — some commenters even suggest that the importance of trouble-free retrieval is on a par with the importance of the secureness of the joining knot.
However, as at least one author (involved in S.A.R. and testing) unequivocally points out, getting down safe is critically important, whereas a stuck rappel knot is never life-threatening, and that furthermore he has not seen an epidemic of ‘stuck-rope’ incidents in any case.
(Incidentally he also calls the Double-Fisherman Bend (inline) the gold standard for security in joining knots, even though it’s widely criticized for getting stuck easily during retrieval, and for being difficult to untie.)
SUMMARY re. Joining Knots: Every climber will decide for himself on factors like the importance of smooth rope retrieval and the relative value in that regard, of flat knots vs. standard/inline bends, but some safety recommendations can be made for all joining knots:
1. Every knot should be neat: side-by-side strands running parallel rather than twisted, no protruding loops. Neatness is important for identifying a knot and verifying that it’s tied right.
2. Adequate tails should be left protruding from every joining knot — what is adequate?: some people recommend 18 inches or 45 cm, some even say they should be a metre long; we suggest a minimum of one foot, or 30 cm.
3. Every joining knot for rappelling should be made snug by pulling every strand tight individually against at least one strand emanating from the other side of the knot — not a companion strand.
4. If concerned about insecurity of a knot because of slippery conditions due to water, snow, ice, or mud, certainly use a backup knot or knots, but then consider the increased ‘snaggability’ of such an arrangement.
5. We recommend using the Double Fisherman Bend (inline) for slippery conditions, or significantly different rope sizes (ie., 2 mm or more), and any other time when in doubt.
Orvel
~~~~~~~~~~~~~~~~~~~~~~~~~~~~~~~~~~~~~~~~~~~~~~~~~~~~~~~~~~~~~~~~~~~~~
Case 4, Dec. 20, 2015
CAUTION: Regarding Keepers on Slings/Carabiners:
A number of accidents have been reported in the last couple of years involving the incorrect assembly or use of quickdraws or other slings with rubber keepers, and the same could apply as well to home-made keepers. Keepers are of course intended and suitable only to hold a sling or a quickdraw snug on a carabiner, but in these cases the keepers were put in positions of holding typical climbing loads of body weight or greater, and failed with disastrous results.
Here are two links to articles relating what happened in some such cases:
http://www.dpmclimbing.com/articles/view/tito-traversa-seriously-injured-climbing-fall
and:
http://www.dpmclimbing.com/articles/view/three-will-face-trial-death-tito-traversa
Unbelievable as it may seem that anyone could think a quickdraw would hold any load if assembled the way that most of Tito Traversa’s draws were, that’s what caused him to fall to his death.

Crab Incorrectly Clipped Past the Runner Loop
I recommend that if it’s necessary to use keepers on your runners but you have any doubt whether the result is safe, just visualize it without the keeper, and the answer should be obvious. In Tito’s case, the nylon sling is completely separate from one carabiner; in the following pictures, the sling loop is in the carabiner but with both strands coming out on the same side — ie., not connected to the carabiner at all.

Deadly Arrangement

Removing Keeper Makes it Obvious
Orvel
~~~~~~~~~~~~~~~~~~~~~~~~~~~~~~~~~~~~~~~~~~~~~~~~~~~~~~~~~~~~~~~~~~~~~
Case 3, Dec. 18, 2015
CONSIDER The complication caused by Skis on the Victim in a Crevasse Rescue:
An experienced member and leader has raised a question of how a crevasse rescue situation could be different if the victim has skis on, vs. no skis. Few people have much experience with any kind of crevasse rescues and so little direct knowledge to draw on, so we expect to start with sensible speculation on various situations, and ask members with any knowledge or insight to contact the Safety Committee at safety@acccalgary.ca to contribute to the discussion.
However for the present time we can make some comments about typical crevasse incidents:
1. A pack can only be a hindrance to the victim and his rescuers, so if possible, it should be removed and extracted first, while at all times the victim must be kept as secure as possible by a rope. Some glacier tourers keep a carabiner (and/or a sling) on the haul loop of the pack for convenience in case of such an emergency).
2. The victim’s skis may also be a hindrance, though usually less so than his pack, but depending on the type of extraction being used. At the same time, skis are usually of absolutely no use to the victim during his rescue, so if possible they should also be removed carefully and taken up safe to the surface.
3. Referring to 1. and 2. above, a crevasse victim is typically wedged with his pack or at least so encumbered by it as to make safe removal of his skis impractical, whereas once the pack is removed, he may be quite able to dispense with his skis in preparation for his own extraction.
Orvel
~~~~~~~~~~~~~~~~~~~~~~~~~~~~~~~~~~~~~~~~~~~~~~~~~~~~~~~~~~~~~~~~~~~~~
Case 2, Dec. 10, 2015
CAUTION: Regarding Twigs and Branches While Bushwhacking:
INCIDENT: On Dec. 6 while a group of Section climbers were returning at dusk through brush and deadfall after a day of climbing in the YaHa Tinda area, one person pushed past a branch, which then snapped back and hit a following companion in the face. It caused a small but deep puncture in her upper cheek and just below her eye, with considerable bleeding. With good care the wound healed well, but obviously the injury could have been a lot more serious if her eye had been hit instead.
Bushwhacking to, from, and during climbs is a common situation for most climbers in this area, so we can only emphasize that you should be alert to hazards and take precautions while moving through brush and forest:

Pushing Past a Dangerous Branch
1. While being followed, you should control branches that could snap back at anyone following you.
2. If following someone in the bush, keep your distance from them and also be alert to what they’re doing, in case they move poles or branches, or cause flying pieces that could hit you or get in your way.
3. Even a person ahead or traveling alone faces a hazard from protruding branches and twigs, especially at face-level, as the face is usually not protected by clothing. The front person is at risk too.
4. Dim light should be a cause for extra care, when hazards are harder to notice.
Just some things to keep in mind ….
Orvel
~~~~~~~~~~~~~~~~~~~~~~~~~~~~~~~~~~~~~~~~~~~~~~~~~~~~~~~~~~~~~~~~~~~~~
Case 1, May 31, 2015
CAUTION: Extending Tripled-Up Alpine Sling Runners
This concerns a very popular device that has been known for likely at least 30 years – YOU know it and most likely use it, but do you know ALL about it? It results from a popular quick method of shortening long slings for convenient racking as well as for use as a quickdraw. This is now in use by most climbers, but has an associated safety issue that may still be widely unknown.
The method of shortening starts with typically an ‘alpine-length’ loop sling, extended and with 2 carabiners clipped on, one at each end.
Alpine Sling
Alpine Sling ‘ Over the Shoulder’
Such a sling is often called “shoulder-length” as it’s a loop with a perimeter of about 1.5meters, that can conveniently be carried slung over the climber’s head and one arm from the far shoulder.

Pass One Crab Thru the Other to Start
The method consists of passing one carabiner through the other — generally the ‘bottom’ crab through the ‘top’ one — then pulling the first one down level with the twin loop now hanging from the top one, and clipping it on to both of those loops.

Clip the Crab on the 2 Loops
This convenient technique quickly creates a runner of one-third the length of the original (extended) sling, and so I refer to it descriptively as a “tripled-up alpine sling runner” in the absence of a common term.

Tripled-Up Alpine Sling Runner
This is a convenient length for racking or clipping on to harness gear-loops, similar to quickdraws, but has the advantage over sport-climbing quickdraws, of being extendable to either the full alpine length or half of it for any of the various purposes that come up in climbing.

Don’t Unclip One
BUT a HAZARD occurs when extending such a runner by unclipping a loop of the sling from either carabiner in order to lengthen it, for example to straighten the line of the rope on a climb, or for use as a tie-in at a belay station, especially when it’s inconvenient for the climber to check the resulting extension.
In this ‘tripled-up sling runner’, each carabiner holds 3 loops of the sling, and they seem generally identical to a casual view: but in fact they are all unique, and one loop of the three on each carabiner is a ‘deadly’ loop, as it’s the ‘original’ loop which was on the carabiner before the sling was shortened, and if unclipped, it results in the sling pulling through both crabs and disconnecting completely from the one unclipped.
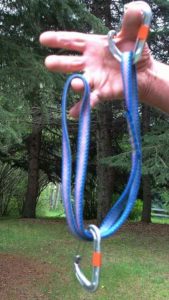
Deadly Result
Another loop is ‘safe’, as its two strands go to the other carabiner from opposite sides, and so collapse on to that crab in a tight loop if dropped; and the third loop on each carabiner may be either ‘safe’ or ‘deadly’, depending on exactly how the sling was originally shortened.
A recent accident in Colorado (Wayne Crill, Aug. 9, 2014 in Eldorado Canyon) resulted in a serious-injury groundfall after two of the climber’s highest runners disconnected from the carabiners on the rope when he fell. The circumstances and the victim’s acquaintances suggest strongly that tripled-up alpine slings had been incorrectly extended without checking, in a section of difficult climbing just before the climber fell. The coincidence of that happening with two pieces in sequence is remarkable, but could indicate a meticulous technician who used a consistent technique, but got it wrong. It’s possible that he knew which loop to unclip so that the carabiner came away clean from the sling, in order to make it easier and neater to reclip at the length he wanted, except that in this case his attention was distracted from that final step, by his precarious position: he unclipped the deadly loop but did not reclip the sling.
We bring this up to alert or remind climbers of this danger, since it would be awkward and completely impractical to analyze the loops on every (or ANY) such runner during lengthening while climbing.
I addressed this concern in the November 2008 issue of the Chinook, which can be accessed through this site and includes some sketches. At that time I advised against using the ‘tripling-up’ method of shortening alpine-length slings, but that method has become so popular that we now offer 2 alternative suggestions for safe extension of tripled-up alpine sling runners as well as the option of using the continuous-loop configuration of shortening:
1. Verify every sling immediately upon extending it, if possible, OR
2. If it’s not possible, always UNCLIP TWO of the three loops from one carabiner — never only one loop; ie., always LEAVE only ONE LOOP clipped on to the carabiner, as any one loop is secure by definition. That results in a full and safe extension of the sling, which may then be ‘doubled up’ easily instead, if you like; OR

Classic Triple-Loop Alpine Quickdraw
3. Use the classic continuous triple-loop method of shortening alpine slings, instead of the pull-through-and-clip-the-hanging-loops method. In that configuration the shortened sling comprises 3 coils in a continuous helix, with both carabiners clipped through all of them in parallel, and either one or two coils may be unclipped from either carabiner without creating a dangerous condition of the runner.
Orvel Miskiw
*********************************************************************
The CALGARY SECTION SAFETY COMMITTEE
Purpose: “To Promote Safety in Alpinism with particular attention to matters of special or additional interest to the Calgary Section and the Calgary mountaineering community.”
The Calgary Section Safety Committee reports to the Board of Directors of the Calgary Section and may act either or both at the request of the Board or independently in cases of no specific request.
Work: The work of the Calgary Section Safety Committee includes:
1. to receive reports and information regarding accidents or dangerous incidents, and potentially dangerous practices and equipment, involving Section members and also non-members, and
2. to discuss and analyze each case, and
3. to make recommendations to promote safe mountaineering by preventing future related or similar dangerous practices and incidents, and the use (if any) of such equipment. Its recommendations may be given in the form of a report or advice to the Board, or notices in the Section communications media, including the website, or other forms as the Committee considers appropriate in each case.
4. Other activities may be undertaken by the Safety Committee as part of its work. A wide range of means may be considered and used by the Committee in order to fulfill its Purpose: experimentation and testing may be appropriate in some cases.
5. The Safety Committee will cooperate with the Board of the Calgary Section and all its Committees as much as possible, especially Climbing, Mountaineering, Skiing, and Training and Leadership, which are most likely to have interests in its work and communications.
Structure: The current (2020 – 2021) Safety Committee consists of Mitchell Blackstaffe (Chairman), Lida Frydrychova, and Orvel Miskiw.
*********************************************************************